2015. 5. 29. 14:19ㆍIT
Android-NDK (http://developer.android.com/sdk/ndk/index.html)
1. ndk 받자!! -> 원하는 폴더에 풀자 , 그냥 드라이브 최상단에 넣자!
2. Install Eclipse C/C++ Development Tools
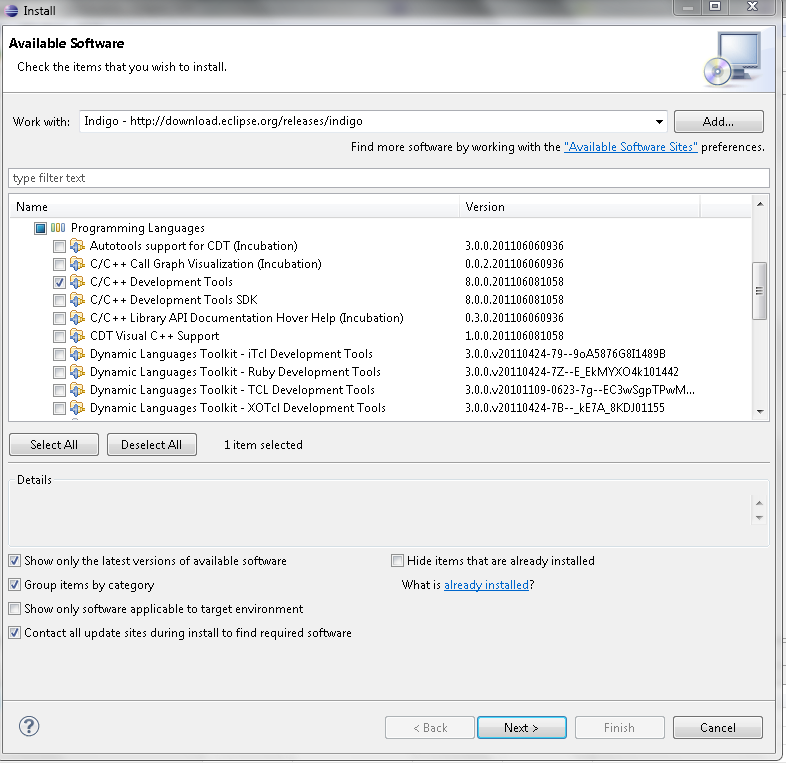
After Eclipse is installed, run it and go to the menu->Help->Install New Software. Select the Indigo or CDT update site. SelectProgramming Languages and select/check C/C++ Development Tools
Click Next and install.
C,C++ 개발킷 설치!
3. Add Androind NDK path into the Eclipse Android Preferences:
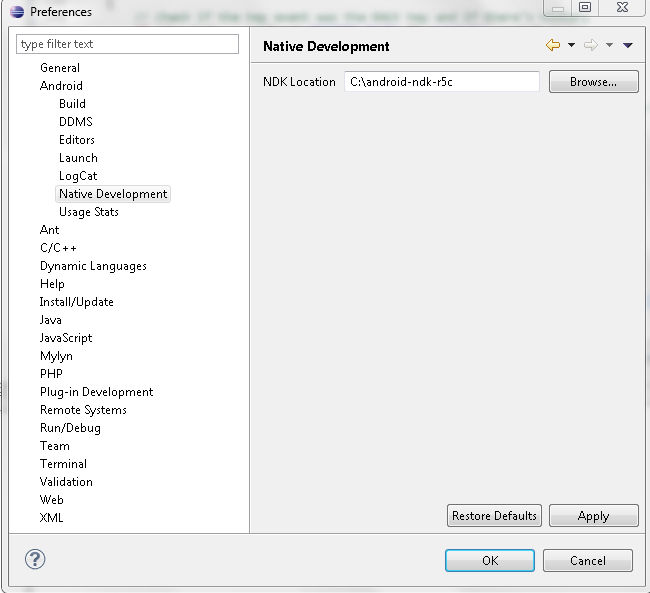
Open the Eclipse Preference (menu -> Window->Preferences), navigate to Android->Native Development then enter the path (yes, the same path as in step 5 again — frankly I am not sure if just doing this step without doing step 5 is enough, so just do both). If you don’t see this option on the Eclipse Preference, restart Eclipse.
NDK 설정 완료!
4. 밑에 설명처럼 하면 끝!!!! 프로젝트 클린하고 라리브러리 폴더 새로고침한후에 안을 들여다 보면 .so 파일이 생성되어있다!!!!!!!!
확인할점!!!!
jni 폴더 -> Android.mk
LOCAL_MODULE := ccc-library
LOCAL_SRC_FILES := ccc-decoder.c
#############################################
LOCAL_MODULE => 라이브러리 이름 나중에 자바소스에서 라이브러리 부를때 이이름으로 부른다!!!!!
ex)
static {
System.loadLibrary("ccc-library");
}
LOCAL_SRC_FILES => jni 폴더에 있는 c 파일을 써준다. 어찌하다가 cpp파일 생성되어 cpp로 설정되는 경우있는데 그냥 c 파일로 설정 해주자!! c파일없음 cpp로 하고~~
#############################################
5. so 파일도 생성됬으니 프로젝트->properties-> android -> is library 체크해주고 다른프로젝트에서 가져다 쓰자!
opencv 팁
# OpenCV - opencv manager package was not found 인스톨 따로 안하고 실행시킬수 있다
OPENCV_CAMERA_MODULES:=on
OPENCV_INSTALL_MODULES:=on
절대 경로 변경
#include ../../sdk/native/jni/OpenCV.mk
include D:/open_cv/sdk/native/jni/OpenCV.mk
\\\\\\\\\\\\\\\\\\\\\\\\\\\\\\\\\\\\\\\\\\\\\\\\\\\\\\\\\\\\\\\\\\\\\\\\\\\\\\\\\\\\\\\\\\\\\\\\\\\\\\\\\\\\\\\\\
\\\\\\\\\\\\\\\\\\\\\\\\\\\\\\\\\\\\\\\\\\\\\\\\\\\\\\\\\\\\\\\\\\\\\\\\\\\\\\\\\\\\\\\\\\\\\\\\\\\\\\\\\\\\\\\\\
\\\\\\\\\\\\\\\\\\\\\\\\\\\\\\\\\\\\\\\\\\\\\\\\\\\\\\\\\\\\\\\\\\\\\\\\\\\\\\\\\\\\\\\\\\\\\\\\\\\\\\\\\\\\\\\\\
참고
\\\\\\\\\\\\\\\\\\\\\\\\\\\\\\\\\\\\\\\\\\\\\\\\\\\\\\\\\\\\\\\\\\\\\\\\\\\\\\\\\\\\\\\\\\\\\\\\\\\\\\\\\\\\\\\\\
\\\\\\\\\\\\\\\\\\\\\\\\\\\\\\\\\\\\\\\\\\\\\\\\\\\\\\\\\\\\\\\\\\\\\\\\\\\\\\\\\\\\\\\\\\\\\\\\\\\\\\\\\\\\\\\\\
http://thdev.net/474
생성된 프로젝트 목록을 보면 jni 폴더가 기본적으로 생성이되며, 바로 위에서 작성한 이름인 AndroidNDK라는 이름의 cpp와 Android.mk 빌드파일이 생성되었습니다.
실제로 이렇게 하면 문제가 있습니다. #include <jni.h> 가 추가된 AndroidNDK.cpp가 있지만 빌드에는 문제가 없지만 실제로 프로젝트에 오류가 나게 됩니다. 그 오류를 해결 하기위한 방법을 설명하겠습니다. 이 방법은 모든 NDK 프로젝트를 만드실 때 항상 추가해주셔야 하는 부분입니다.
프로젝트 오른쪽 마우스를 클릭하여 Properties 로 이동합니다. 프로젝트 설정을 뛰우면 아래와 같이 C/C++ Build와 C/C++ General 2개가 추가된것을 확인할 수 있습니다. C/C++ General->Paths and Symbols를 선택합니다. 여기에 새로운 경로를 하나 추가해주어야 합니다. 추가하기 전에 해주어야 할 사항이 있습니다. 보시는 것과 같이 C:\android-ndk\ .. 처럼 모든 경로가 표시가 됩니다. 이 경우 해당 PC에서는 문제가 없지만 ndk 경로가 D:\로 이동한다면 문제가 생기기 쉽습니다. 이런 부분을 해결하기 위해서 모든 OS에서는 Path라는게 있습니다.
이 Path를 등록해주면 모든 PC에 같은 PATH 이름만 있다면 어디든 문제없이 빌드가 가능해질 수 있으니 이 부분을 추가해주면 됩니다. PATH 등록 부분은 윈도우에서 하는 방법을 설명합니다.
윈도우 8을 기준으로 설명하는 부분이므로 다른 버전의 윈도우와는 다를 수 있습니다.
제어판을 실행하고, 시스템, 보안 탭을 클릭합니다.
아래의 메뉴에서 "시스템"을 선택합니다.
"고급 시스템 설정"을 선택합니다.
다른 OS에서는 내 컴퓨터의 오른쪽 마우스를 선택하여 -> 시스템 설정을 선택하셔도 됩니다.
고급탭에 이동하시면 "환경 변수"가 있습니다. 이 환경 변수를 클릭합니다.
환경 변수에서 "추가" 버튼을 클릭합니다. 이미 NDKROOT 가 있으시다면 등록하시지 않으셔도 됩니다.
이름은 NDKROOT 또는 NDK_ROOT 등으로 구분되는 이름을 추가하시면 됩니다. 이 경로는 NDK를 설치한 경로를 적어주시면 됩니다. 저는 C:\android-ndk가 기본 경로이므로 아래와 같이 적어주었습니다.
Eclipse를 재시작하고나야 다시 등록이 가능합니다. 아까와 동일한 메뉴에서 c,cpp에 대한 Include를 해주면 됩니다.
오른쪽의 Add..를 클릭하고 다음의 경로를 추가해주시면 됩니다.
${NDKROOT}\platforms\android-9\arch-arm\usr\include
${NDKROOT} 의 경우는 Path 등록한 이름이어야 합니다.
위와 같이 등록이 완료되면 Project->clean 으로 가서 프로젝트 클린을 한번해줍니다. 그리고 ctrl+b를 눌러 프로젝트 빌드를 해주시면 됩니다. 이것보다 간단한 방법을 사용할려면 아래의 내용을 더 추가해주시면 됩니다.
이번에는 C/C++ Build를 눌러 Behaviour 를 선택하시고, Clean을 체크해제하시고, Build on resource save (Auto build)와 Build 를 체크합니다. 아래와 같이 빈 창으로 두시면 됩니다. 이렇게 하면 클린만 하시면 자동으로 빌드가 이루어집니다. (단점은 클린할 때마다 빌드가 되니 클린 할때도 현재 프로젝트에 대해서만 클린하시기 바랍니다.)
//////////// http://tools.android.com/recent/usingthendkplugin ////////////////////////////////
ADT 20 includes an NDK plugin that provides support for building and debugging NDK projects in Eclipse. This document describes how to install and use the NDK plugin.
- Download Eclipse for Java.
- Install CDT from Eclipse update site http://download.eclipse.org/tools/cdt/releases/indigo.
- Install Android SDK + NDK Plugins from Eclipse update site https://dl-ssl.google.com/android/eclipse/
1. First set the path to SDK and NDK:
Eclipse -> Window -> Preferences -> Android -> set path to SDK
Eclipse -> Window -> Preferences -> Android -> NDK -> set path to the NDK
Note that you will not be able to add native support if the project already has C/C++ nature.
At this point, you will be able to build your applications using Project -> Build All.
Debugging native applications
1. Update your build config to include “NDK_DEBUG = 1”.
Right click project -> properties -> C/C++ Build:
3. Right click on your project, select Debug As -> Android Native Application
Note: There is a delay of a few seconds between when the activity is launched and when native debugging starts. If your code is already executed by that point, then you won’t see the breakpoint being hit. So either put a breakpoint in code that is called repetitively, or make sure that you call JNI code after you see that ndk-gdb has connected.
Known Issues
1. Eclipse does not automatically find the include paths to all the NDK headers on Windows. This issue will be fixed in the next update (20.0.1) when it is released.
2. Eclipse does not automatically find the include paths with CDT 8.1.0 (Juno). This issue is tracked in Bug 33788.
======================================================================================================
//////////// http://stackoverflow.com/questions/27462754/compiling-hello-jni-failure-in-eclipse-only-when-opening-the-hello-jni-c-file-in ////////////////////////////////
I have been trying endlessly to build the sample HelloJni sample project for the Android NDK.
How I set up the environment:
I followed the instructions of the getting started in the docs: android-ndk-r10d\docs\Getting_Started/html/index.html:
- Downloaded Eclipse Luna
- Downloaded the Android SDK
- Downloaded the Android NDK: android-ndk-r10d
- Set the NDK installation folder in eclipse in preferences window -> android -> NDK.
- Imported the hellp-jni sample.
- Right click on the HelloJni Project -> Android tools -> Add native support.
- Cleaned and Built the project.
- Ran on my device the HelloJni library (not the tests)
And the app is running and everything is WORKING and I can see the generated .so file per architecture in the libs folder of the project (for every architecture, for example armebi, mips, etc...)
Here is a Print Screen showing everything is working:

Now here comes the strange part...
The Problem:
If I open the hello-jni.c file for editing or viewing in eclipse, I suddenly see compilation errors and I can't build and can't run the project anymore...
Here is a Print Screen showing that after i open the file, I suddenly get compilation errors:

What I have already tried but failed:
- Adding the Android Native Nature, then removing it by: Deleting the .project file, the buildCommand tag of: org.eclipse.cdt.managedbuilder.core.genmakebuilde, the buildCommand tag of: org.eclipse.cdt.managedbuilder.core.ScannerConfigBuilder and removing the lines: [nature]org.eclipse.cdt.core.cnature[/nature] [nature]org.eclipse.cdt.core.ccnature[/nature] [nature]org.eclipse.cdt.managedbuilder.core.managedBuildNature[/nature] [nature]org.eclipse.cdt.managedbuilder.core.ScannerConfigNature[/nature] removing the .cproject and all compiled files. Then adding back the Android Native Nature.
According to this stackoverflow link: Eclipse ADT - Unresolved inclusion jni.h
Failed
- Once I got the error of (I am not getting it anymore): Unable to launch cygpath. Is Cygwin on the path?] java.io.IOException: Cannot run program "cygpath". So I Googled and I changed the build settings to give the absolute path of my NDK installation folder:
According to this stackoverflow link: Unable to launch cygpath in android
Here is a Print Screen: 
Failed
- Changing the Used tools from Android GCC Compiler to GCC C Compiler
according to this stackoverflow link: Android NDK build, Method could not be resolved
Here is a Print Screen: 
Failed
- Copying an eclipse Luna installation from a friend that has the project working for him.
Failed
I have been spending hours on this and I couldn't find any solution to why this is happening.
======================================================================================================
'IT' 카테고리의 다른 글
| 이클립스 가장처음 할것 android adt 설치 (0) | 2015.06.15 |
|---|---|
| android studio ndk (0) | 2015.05.29 |
| NDK 개발환경 구축하기 (이클립스 + Cygwin) (0) | 2015.05.13 |
| [NDK] 이클립스를 이용한 build (0) | 2015.05.13 |
| 안드로이드 개발시 Java Version - Using 1.7 requires compiling with Android 4.4 (KitKat); (0) | 2015.05.13 |


